
Legal information · Infrastructure accessibility
Accessible Infrastructure and Buildings
See examples and videos showing the barriers people may encounter, from approaching a building to receiving services inside.
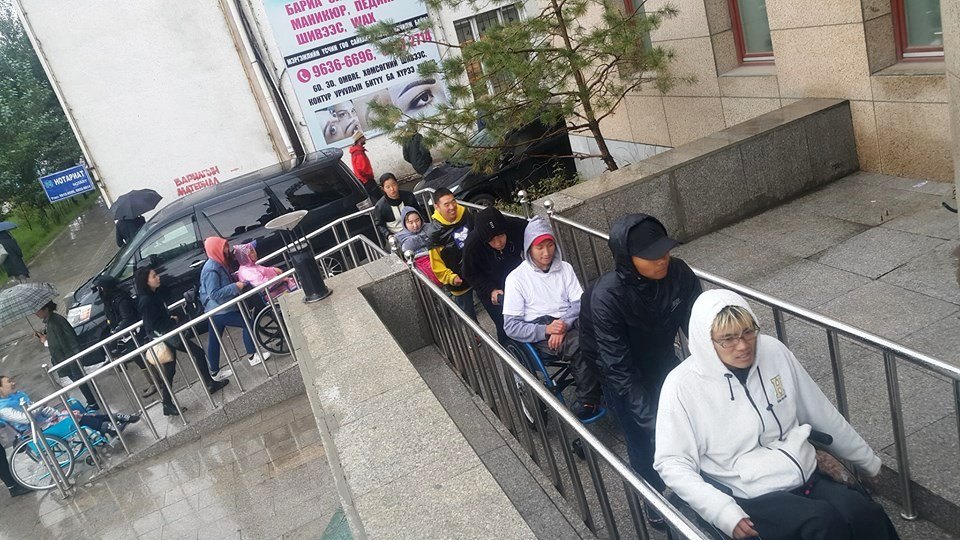
8 steps
Reaching and entering a building, step by step
These eight topics explain what to look for, from approaching a building to receiving services inside. Choose a topic that interests you.
Watch this video first
Watch this video for an overview of how to assess environmental accessibility. Mongolian subtitles are available.
At 0:08, the video mentions standards MNS 6055:2009 and MNS 6808:2019. Check official sources for the requirements currently applicable to design and renovation work.
This page provides learning and introductory materials. When constructing or renovating a building, follow the standards currently in force and seek advice from qualified professionals.
Lesson 1 / 8 · The approach
Sidewalks and crossings
A continuous, level and unobstructed route is the first requirement for reaching a building. Blind people need tactile guidance paths, and wheelchair users need curb ramps at crossings.
Key points from the video
- Assess whether the pedestrian route is wide enough, has a gentle slope, and is free from damage and obstructions (0:06).
- The yellow tactile guidance path continues along the sidewalk, with warning studs at changes of direction (1:21).
- A 3D illustration shows a ramped section, a level landing and tactile warning studs at a pedestrian crossing (1:21).
Follow the standards currently in force when calculating actual dimensions and gradients.
What barriers might people encounter?
- Poles or columns installed on the tactile guidance path
- Damaged paving and curbs
- Wheelchair wheels catching against a high curb ("Universal Design" video, 12:01)
What should you look for?
- Check the entire route to the building, rather than isolated sections.
- Keep the tactile guidance path clear and ensure its color contrasts with the surrounding surface.
- Check that every crossing has a curb ramp and tactile warning studs.
Explanatory illustration
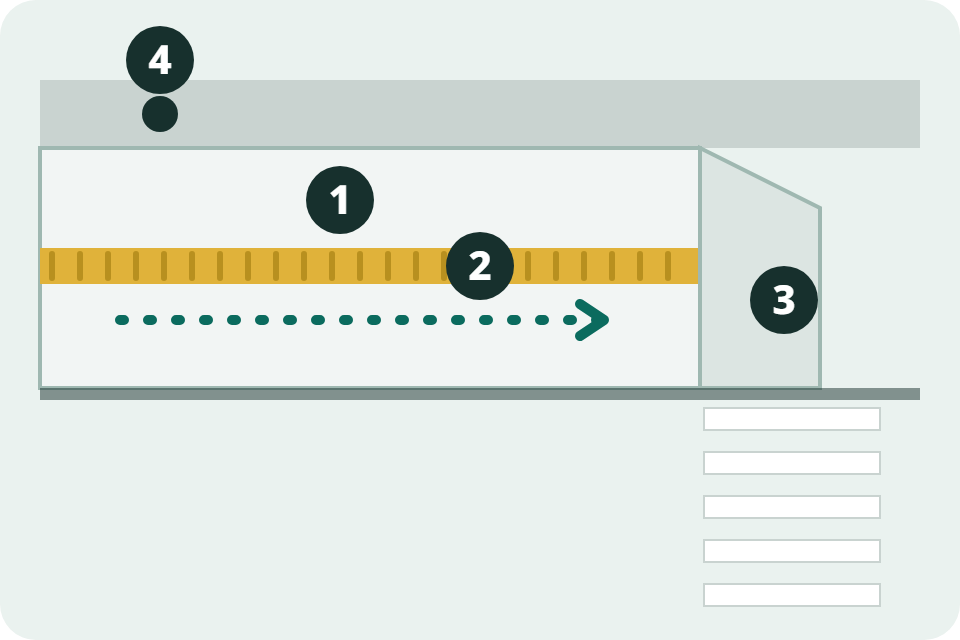
- An unobstructed, continuous route
- Yellow tactile guidance path
- Curb ramp at the pedestrian crossing
- Poles and signs outside the pedestrian route
Explanatory illustration; determine actual dimensions using the standards currently in force.
Official sources:
Lesson 2 / 8 · Parking
From accessible parking to the entrance
Understand whether a wheelchair user can get out of a vehicle and reach the entrance along an unobstructed route.
Key points from the video
- Assess whether accessible parking is close to the building entrance (0:56).
- A diagram shows a separate access aisle beside the parking space for getting in and out of a vehicle (0:56).
- Allocate a proportion of parking spaces as accessible parking, with identifying markings and upright signs (0:56).
- Diagram of a curb ramp connecting the parking area to the sidewalk (1:16).
Follow the standards currently in force when calculating actual dimensions and gradients.
What barriers might people encounter?
- Difficulty getting in and out of a vehicle because there is no accessible parking outside the workplace (interview)
- No access aisle, with the neighboring vehicle parked too close
- A high curb without a ramp between the parking area and the sidewalk
What should you look for?
- Markings both on the ground and on an upright sign
- Keep the access aisle clear.
- A continuous route with ramps from the parking area to the entrance
Explanatory illustration
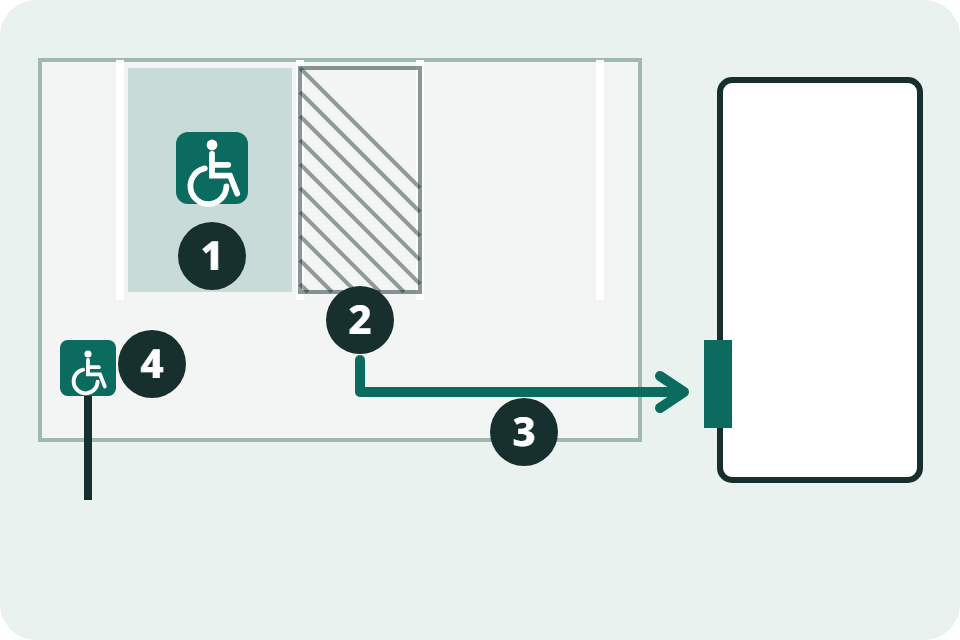
- Marked accessible parking space
- Access aisle for getting in and out
- Continuous route to the entrance
- Upright identification sign
Explanatory illustration; determine actual dimensions using the standards currently in force.
Official sources:
Lesson 3 / 8 · Entrances and ramps
Entrances and ramps
Ramps allow wheelchair users and people with mobility impairments to move easily between two levels. Understand why the gradient, landings and handrails all matter.
Key points from the video
- Design ramps so wheelchair users and people with mobility impairments can move easily between two levels (0:06).
- Assess whether there are landings at the beginning, end and turns, along with edge protection and handrails (0:46).
- A calculation example shows how greater height requires a longer ramp (0:56–1:31).
- Extend handrails beyond both ends and provide a slip-resistant surface (2:31, 0:46).
Follow the standards currently in force when calculating actual dimensions and gradients.
What barriers might people encounter?
- Steps outside the building, with no ramp (interview)
- A ramp that is too steep and does not meet standards (interview)
- No handrails and a slippery surface
What should you look for?
- Check the gradient, landings and handrails together.
- A level landing in front of the door
- Check the standards currently in force for the required gradient.
Explanatory illustration
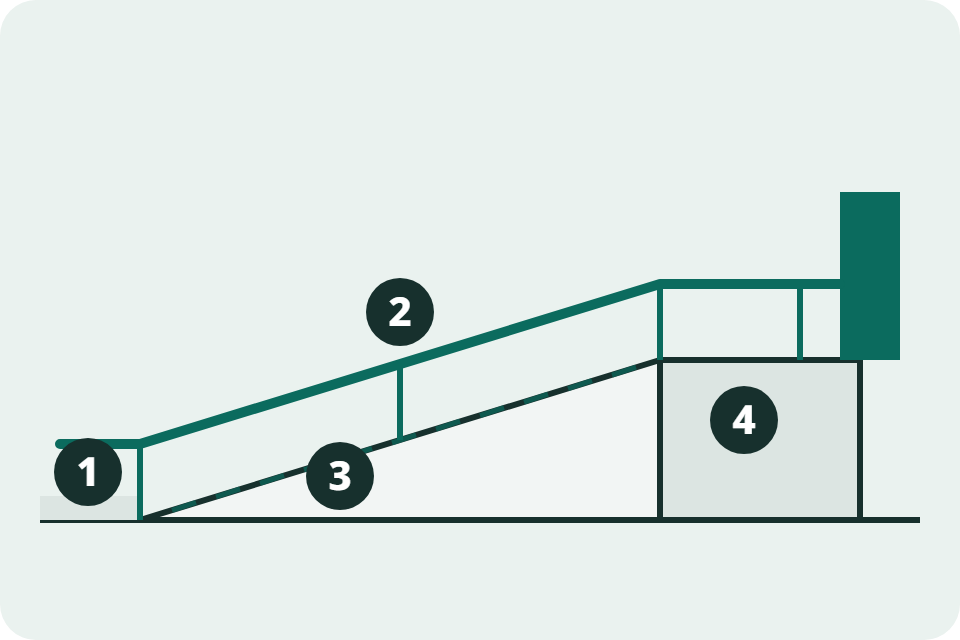
- Lower landing
- Handrail extending beyond the ends
- Slip-resistant surface
- Upper landing in front of the door
Explanatory illustration; determine actual dimensions using the standards currently in force.
Official sources:
Lesson 4 / 8 · Doors
Doors: width, thresholds and opening force
Understand how door width, thresholds, opening force and glass-door markings affect wheelchair users and people with low vision.
Key points from the video
- Assess whether the exterior door has a low threshold, sufficient clear opening width and is easy to open (0:13).
- Enough space between two successive doors to accommodate a wheelchair (0:13)
- Assess whether glass doors have high-contrast markings and Braille information (0:13); photo of a glass door with a colored strip (2:25).
- Hinged, sliding and folding doors should all provide the same clear opening width (2:01).
Follow the standards currently in force when calculating actual dimensions and gradients.
What barriers might people encounter?
- Unable to pull open a heavy door from a wheelchair (interview)
- A high threshold
- A glass door without markings
What should you look for?
- Opening force and handle design
- Space for a wheelchair to turn on both sides of the door
- High-contrast glass-door markings
Explanatory illustration
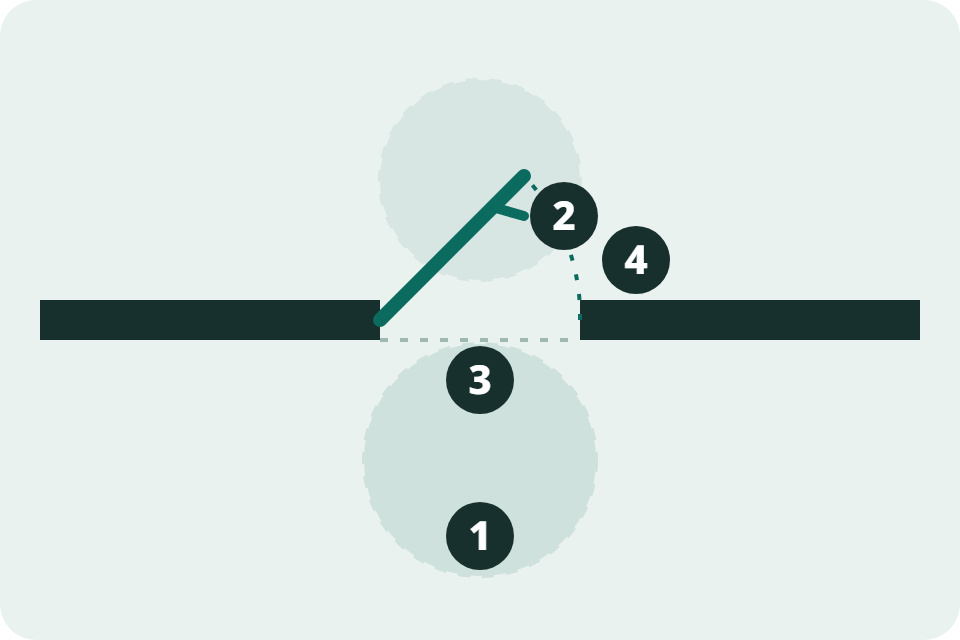
- Clear space in front of the door
- An easy-to-grip handle
- No threshold or a low threshold
- Opening direction and a door that is easy to open
Explanatory illustration; determine actual dimensions using the standards currently in force.
Official sources:
Lesson 5 / 8 · Moving around inside
Moving around inside buildings and universal design
Understand the idea of "universal design": making corridors, rooms and workplaces easy for everyone to use.
Key points from the video
- The international basis for accessibility: Articles 9 (accessibility) and 19 (independent living) of the UN Convention on the Rights of Persons with Disabilities (1:31).
- The definition of universal design (5:31) and examples explaining its seven principles (7:31–14:01).
- Photos of the organization's accessibility assessment work: ramps, measurements and guiding a person using a white cane (19:01).
See the "Toilets" video at 1:31 for an example of turning space inside a building.
What barriers might people encounter?
- Limited space for a wheelchair to turn between successive doors and corridors
- A wheelchair does not fit under the work desk (interview)
- Equipment positioned out of reach (interview)
What should you look for?
- Wheelchair turning space in corridors, at corners and in every room
- Adapt desks and equipment to the user's needs.
- Develop solutions in consultation with the person concerned.
Explanatory illustration
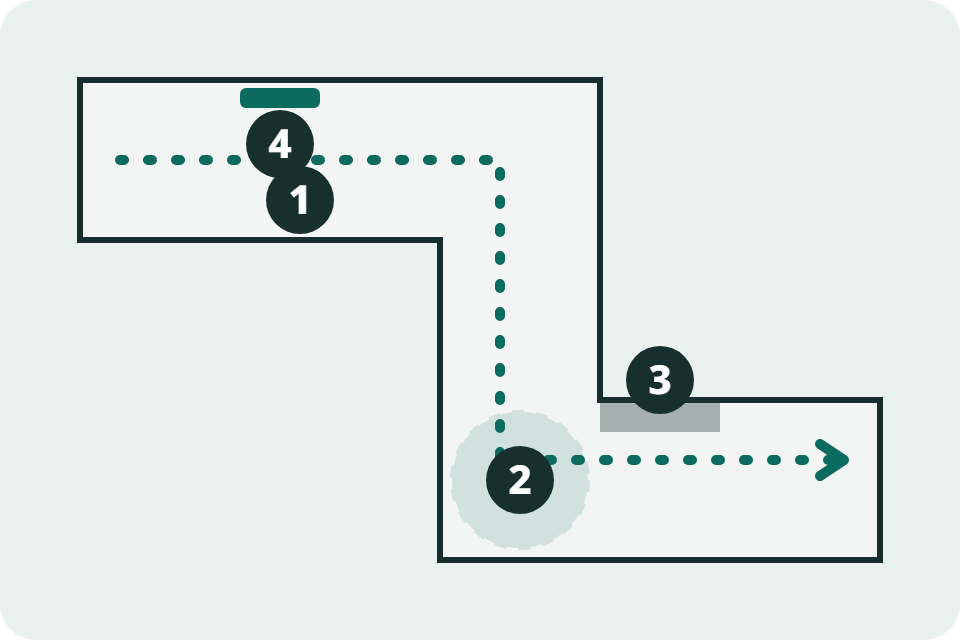
- An unobstructed corridor
- Wheelchair turning space
- Furniture outside the pedestrian route
- Clear signs
Explanatory illustration; determine actual dimensions using the standards currently in force.
Official sources:
Lesson 6 / 8 · Elevators and stairs
Elevators and stairs
Understand the conditions needed to move safely and independently between floors using elevators and stairs.
Key points from the video
- Assess whether the elevator doorway and car can accommodate a wheelchair ("Elevators," 0:11).
- Braille buttons, audible floor announcements and a tactile warning surface in front of the doors ("Elevators," 0:11).
- Controls at a height reachable by wheelchair users ("Elevators," 1:01).
- Tactile warning studs at the top and bottom of stairs, with Braille or raised lettering at the ends of handrails ("Stairs," 0:31); photos of yellow step-edge strips and Braille plates ("Stairs," 1:21).
Follow the standards currently in force when calculating actual dimensions and gradients.
What barriers might people encounter?
- Buttons positioned too high, without Braille
- Indistinct step edges that may cause a person with low vision to trip
- Stairs without handrails or with interrupted handrails
What should you look for?
- Both audible and visual information in elevators
- Mark the beginning and end of stairs with tactile warning studs.
- Provide continuous handrails.
Explanatory illustration
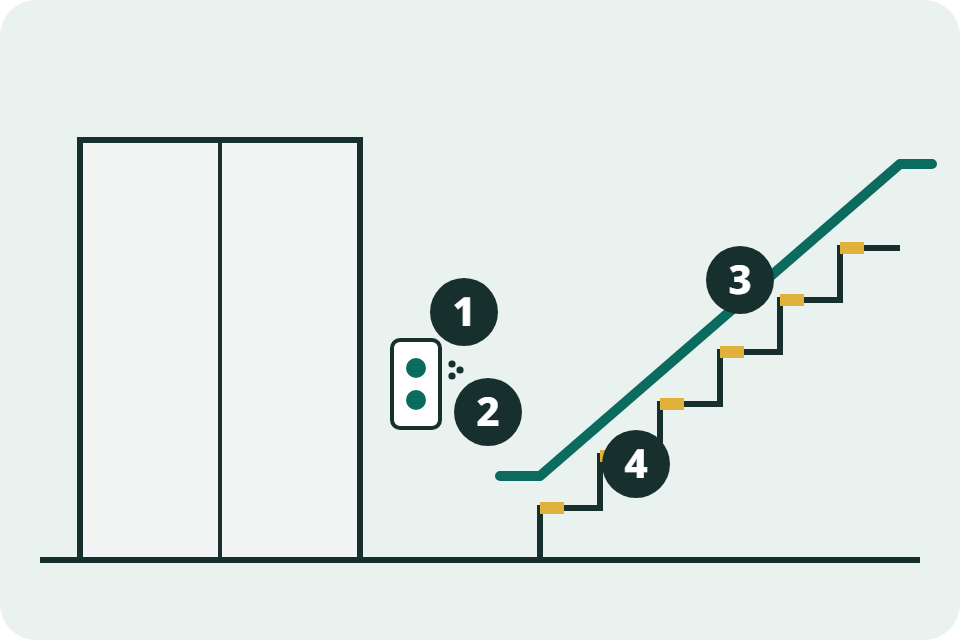
- A call button at a reachable height
- Braille markings
- Stair handrail
- Contrasting step edges
Explanatory illustration; determine actual dimensions using the standards currently in force.
Official sources:
Lesson 7 / 8 · Toilets
Accessible toilet
Understand the conditions that allow a wheelchair user to enter, turn and use the facilities without assistance.
Key points from the video
- A room providing the space and additional equipment needed by people with disabilities (0:01).
- The sink, mirror, switches and hand dryer at a height reachable from a wheelchair (0:21).
- The assessment includes grab bars beside the toilet and the dimensions of the cubicle (0:21).
- A wheelchair turning circle shown on the floor plan (1:31).
Follow the standards currently in force when calculating actual dimensions and gradients.
What barriers might people encounter?
- A door that is too heavy to open (interview)
- No grab bars (interview)
- Insufficient space (interview)
What should you look for?
- Check the door, turning space, grab bars and equipment heights together.
- A wide doorway with a low threshold (0:21)
- Develop solutions in consultation with the person who will use them.
Explanatory illustration
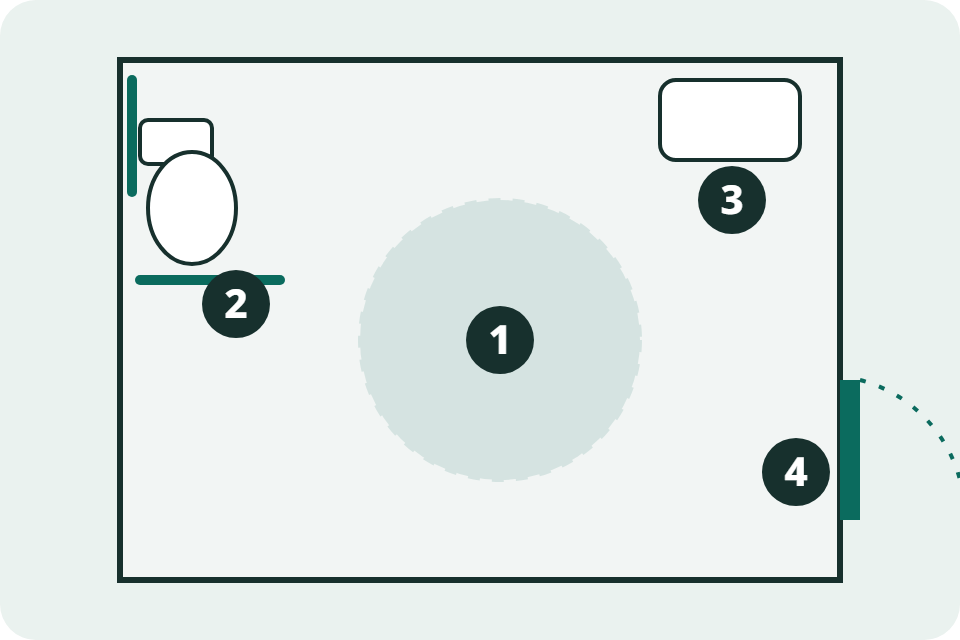
- Wheelchair turning space
- Grab bar
- A sink and mirror at a reachable height
- A wide doorway with a low threshold
Explanatory illustration; determine actual dimensions using the standards currently in force.
Official sources:
Lesson 8 / 8 · Information and signs
Information for different visual and hearing needs
Understand why providing information in multiple forms—visual, audible and tactile—is important for people with visual or hearing impairments.
Key points from the video
- Directional signs and wall signs at eye level, with large raised lettering that contrasts with the background (0:41).
- Assess the availability of a sign language interpreter and reception staff's basic knowledge of sign language (0:41).
- News on electronic displays presented as text and with sign language interpretation; emergency alerts combining light and sound (0:41, 1:01).
- Photo example of a board with a tactile map (1:16).
Follow the standards currently in force when calculating actual dimensions and gradients.
What barriers might people encounter?
- Information provided only through sound is unavailable to people with hearing impairments.
- Small text with poor background contrast is unreadable for people with low vision.
- Emergency alerts using sound alone
What should you look for?
- Provide information in at least two forms: visual and audible/tactile.
- Use pictograms, large lettering and contrasting colors.
- Staff with a basic knowledge of sign language
Explanatory illustration
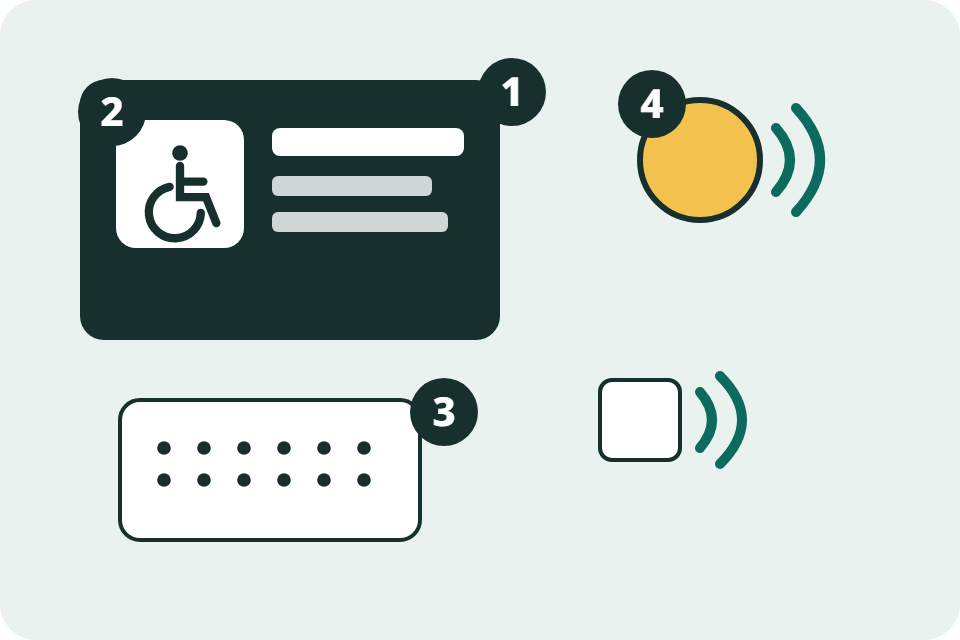
- A clear sign that contrasts with its background
- Pictogram
- Braille and raised lettering
- Visual and audible alerts
Explanatory illustration; determine actual dimensions using the standards currently in force.
Official sources:
Standards, codes, regulations and orders
When planning design or renovation work, check the official versions of the relevant documents and any amendments.
Standards
Codes and regulations
Orders
Quick contact
Ask about environmental accessibility
Briefly describe your question about the lessons or your request for information about environmental accessibility and submit it. The organization will receive your request and contact you using your preferred method.
Contact us directly
If the form does not load, contact us directly by telephone, email or Facebook.